

Introduction
If you’re looking for the perfect homemade Gipfeli recipe, you’re in the right place! Gipfeli, a beloved Swiss pastry, is known for its light, flaky texture and rich flavor. Similar to a croissant but uniquely Swiss in character, Gipfeli is a delightful breakfast treat, perfect for pairing with coffee or tea.
Making Gipfeli from scratch allows you to enjoy their golden, buttery layers fresh from the oven while customizing the recipe to your taste—whether classic, sweet, or savory. With this step-by-step guide, you’ll master the art of homemade Gipfeli recipe and impress your family and friends with these irresistible pastries!
What is Gipfeli? A Swiss Breakfast Delight
1. Origin of Gipfeli
Gipfeli, often referred to as the Swiss cousin of the croissant, holds a special place in Swiss culture and cuisine. Its name originates from the German word “Gipfel,” meaning “summit” or “peak,” likely referring to its crescent-like shape. This flaky, crescent-shaped pastry has been a breakfast favorite in Switzerland for generations, celebrated for its simplicity and versatility. If you’ve ever wanted to recreate this Swiss classic at home, this homemade Gipfeli recipe will guide you through achieving the perfect balance of flakiness and flavor.
Unlike its French counterpart, the croissant, Gipfeli is less buttery and has a slightly denser texture, making it a more compact and less greasy option. While croissants are renowned for their ultra-light layers that melt in your mouth, Gipfeli offers a heartier bite without sacrificing the flaky texture that pastry lovers adore. This makes it particularly appealing for people looking for a satisfying breakfast pastry that doesn’t feel overly indulgent.
The origins of Gipfeli date back centuries, and the pastry has evolved alongside Swiss culinary traditions. Often enjoyed in bakeries and cafes across Switzerland, it has become a cultural symbol of the country’s rich baking heritage. Today, Gipfeli is a common sight on Swiss breakfast tables, symbolizing comfort, tradition, and the simple pleasure of enjoying a well-made pastry.
2. Why Gipfeli is Perfect for Breakfast
If there’s one meal Gipfeli truly shines in, it’s breakfast. The buttery, flaky texture pairs beautifully with a warm cup of coffee or a comforting mug of hot chocolate. Its crescent shape is not just aesthetically pleasing but also functional, making it easy to tear off a piece to dip into your morning beverage.
One of the reasons Gipfeli is a beloved breakfast choice is its incredible versatility. Whether you prefer sweet or savory options, Gipfeli caters to all tastes. For a sweet breakfast, it’s common to pair Gipfeli with fruit jams, honey, or even a spread of rich chocolate hazelnut cream. The neutral flavor of the pastry allows the toppings to shine, creating a perfect balance of textures and tastes.
For savory enthusiasts, Gipfeli can be paired with slices of cheese, cured meats, or even eggs for a more substantial start to the day. Its compact, flaky nature makes it an ideal companion to both light and hearty breakfast options, offering endless possibilities for personalization.
Moreover, Gipfeli’s portability adds to its appeal as a breakfast item. Whether you’re grabbing one from a local bakery on your way to work or preparing a batch at home to enjoy throughout the week, Gipfeli offers the convenience of a satisfying meal on the go without compromising on quality or flavor.
3. Key Ingredients in Gipfeli
The magic of Gipfeli lies in its simplicity. While the final product may look and taste sophisticated, the ingredients required are surprisingly basic, emphasizing the importance of quality over quantity.
- Butter: The cornerstone of any good pastry, butter plays a vital role in creating Gipfeli’s flaky layers. High-quality butter, preferably unsalted, ensures a rich, creamy flavor and contributes to the dough’s elasticity.
- Flour: All-purpose flour is commonly used for Gipfeli dough. Its balanced protein content allows for the right amount of gluten formation, giving the pastry structure without making it too chewy.
- Yeast: Yeast is essential for leavening the dough, giving Gipfeli its characteristic rise and airy texture. Active dry yeast or instant yeast works well for this recipe.
- Milk: Milk adds moisture to the dough and contributes to its soft texture. It also enhances the flavor, creating a subtle sweetness that balances the richness of the butter.
- Sugar: A small amount of sugar is added to the dough, enhancing its flavor without making the pastry overly sweet. This makes Gipfeli versatile enough to pair with both sweet and savory accompaniments.
- Eggs: Eggs are often used in two ways: as part of the dough to enrich its flavor and structure, and as an egg wash to create a glossy, golden-brown finish during baking.
These humble ingredients come together to create something truly special. The process of layering butter into the dough, known as lamination, is what gives Gipfeli its signature flakiness. Unlike croissants, however, Gipfeli dough is typically less rich in butter, which makes it slightly easier to handle and a bit more forgiving for home bakers.
Essential Tools and Ingredients for Homemade Gipfeli Recipe
1. Tools You’ll Need
Creating homemade Gipfeli recipe requires a few basic tools that are likely already in your kitchen. These tools not only make the process easier but also ensure your pastries turn out beautifully flaky and perfectly shaped:
- Rolling Pin: A sturdy rolling pin is essential for rolling out the dough to an even thickness. The smoother and more uniform your dough, the better the lamination (layering of butter) will be.
- Pastry Brush: Use a pastry brush to apply an even egg wash to the Gipfeli before baking. This step ensures a shiny, golden-brown finish that makes the pastries look as good as they taste.
- Baking Sheet: A flat, non-stick baking sheet provides the perfect surface for baking your Gipfeli evenly. For best results, choose a baking sheet with a light color to avoid over-browning.
- Parchment Paper: Lining your baking sheet with parchment paper prevents the Gipfeli from sticking and makes cleanup a breeze. It also helps distribute heat more evenly during baking.
- Sharp Knife or Pastry Cutter: For cutting the dough into precise triangles, a sharp knife or pastry cutter is invaluable. This ensures clean edges, which help the Gipfeli maintain their shape during baking.
Having these tools on hand will streamline the Gipfeli-making process, allowing you to focus on perfecting your technique and enjoying the experience.
2. Choosing the Best Ingredients
The success of your Gipfeli depends heavily on the quality of your ingredients. Since the recipe uses simple components, each one plays a crucial role in achieving the perfect texture and flavor.
- Butter: Butter is the heart of Gipfeli, responsible for their flaky layers and rich taste. Opt for high-quality, unsalted butter for the best results. European-style butter, which has a higher fat content, works particularly well for creating those signature layers. If you’re looking for a vegan alternative, plant-based butter substitutes can be used, but choose one that’s designed for baking to ensure a similar texture.
- Flour: All-purpose flour is ideal for Gipfeli dough because it strikes the perfect balance between structure and tenderness. Make sure to sift the flour to eliminate lumps and ensure a smooth dough.
- Yeast: Fresh yeast or active dry yeast is essential for leavening the dough and creating that light, airy texture. Always check the expiration date of your yeast to ensure it’s active, and consider proofing it beforehand if you’re unsure.
- Milk: Whole milk adds richness and softness to the dough, enhancing the overall texture. For those with dietary restrictions, plant-based milks like almond or oat milk can be used as substitutes, though the texture might vary slightly.
- Sugar: A small amount of sugar is used to lightly sweeten the dough and help it brown during baking. While not overpowering, this touch of sweetness balances the richness of the butter.
- Eggs: Eggs play a dual role in this recipe. They enrich the dough, adding structure and flavor, and are also used in the egg wash to give the pastries a shiny, golden finish. For egg-free variations, plant-based egg substitutes can be used.
By carefully selecting your ingredients and considering high-quality substitutes for dietary preferences, you can ensure your Gipfeli turn out perfectly every time.
3. Tips for Preparing Your Dough
The dough is the foundation of Gipfeli, and mastering its preparation is key to creating flaky, tender pastries. Here are some tips to help you achieve the perfect dough consistency:
- Achieving the Right Dough Consistency
- The dough should be soft and pliable but not sticky. If it’s too wet, add a small amount of flour until it reaches the right consistency. If it’s too dry, add a teaspoon of milk at a time.
- Knead the dough thoroughly to develop gluten, which provides structure and elasticity. However, be careful not to over-knead, as this can make the pastries tough.
- Incorporating Butter for Flakiness
- Cold butter is essential for creating flaky layers. When laminating the dough, ensure the butter remains chilled to prevent it from melting into the dough.
- Roll out the dough evenly, and fold it carefully to create multiple layers. This technique, known as lamination, is what gives Gipfeli their signature flakiness.
- Chilling the Dough
- After each round of rolling and folding, chill the dough in the refrigerator for at least 30 minutes. This helps the butter firm up and makes the dough easier to handle.
- Chilling also prevents the butter from leaking out during baking, ensuring the layers remain distinct and flaky.
By following these tips, you’ll set yourself up for success when it comes to shaping and baking your Gipfeli. The key is patience—taking the time to perfect each step of the process will result in pastries that are light, golden, and irresistibly flaky.
With the right tools, carefully chosen ingredients, and proper preparation techniques, making Gipfeli at home becomes an enjoyable and rewarding experience. These tips ensure that your Gipfeli will look and taste like they’ve come straight from a Swiss bakery!
Step-by-Step Guide to Making Gipfeli at Home
1. Preparing the Dough
The foundation of perfect Gipfeli lies in well-prepared dough. Follow these steps to create a dough that is soft, pliable, and ready for lamination:
- Mix the Dough: Start by combining all-purpose flour, sugar, and a pinch of salt in a large mixing bowl. Dissolve your yeast in warm milk (not too hot, around 105°F or 40°C) and let it sit for 5–10 minutes until it becomes frothy. This indicates the yeast is active. Gradually pour the yeast mixture into the dry ingredients, followed by a beaten egg, and mix until a shaggy dough forms.
- Knead the Dough: Transfer the dough to a floured surface and knead for 8–10 minutes until it becomes smooth and elastic. If it feels too sticky, sprinkle a little more flour as needed, but avoid overdoing it to keep the dough soft.
- Rest the Dough: Place the kneaded dough in a lightly greased bowl, cover it with a damp cloth or plastic wrap, and let it rise in a warm spot for about 1–2 hours or until it doubles in size. Resting allows the gluten to relax and the yeast to work its magic, creating a light and airy texture.
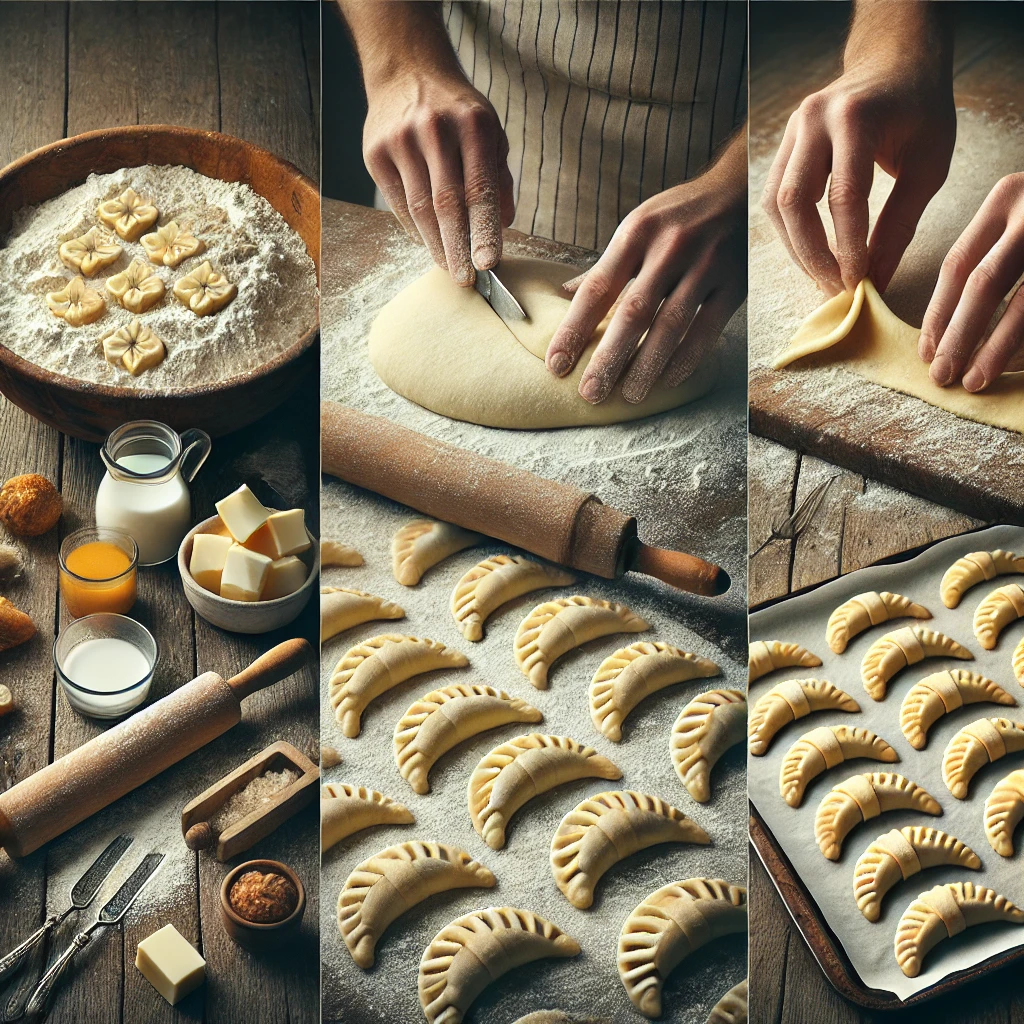
2. Shaping the Gipfeli
Once your dough is prepared and rested, it’s time to shape it into the signature crescent form of Gipfeli. Here’s how:
- Roll Out the Dough: On a floured surface, roll out the dough into a large rectangle, approximately 1/8-inch thick. Keep the thickness even throughout to ensure uniform baking.
- Cut Into Triangles: Using a sharp knife or pastry cutter, divide the rectangle into evenly sized triangles. The base of each triangle should be about 3–4 inches wide, with a pointed tip opposite. If you want mini Gipfeli, make the triangles smaller.
- Fold and Roll: Starting from the base of each triangle, gently roll the dough toward the pointed tip to create a crescent shape. For a more authentic look, slightly curve the ends inward to form a “moon” shape. If you’re adding a filling, like chocolate, jam, or cheese, place a small amount at the base of the triangle before rolling.
- Seal the Edges: Lightly pinch the ends of each Gipfeli to seal the edges and prevent them from unrolling during baking. This ensures a clean, professional look and helps keep any filling inside.
3. Baking to Flaky Perfection
The final step is baking your Gipfeli to golden, flaky perfection. Follow these tips for the best results:
- Preheat the Oven: Preheat your oven to 375°F (190°C) to ensure it’s fully heated by the time your pastries are ready to bake. Using a properly preheated oven is crucial for creating even layers and achieving a crispy exterior.
- Apply the Egg Wash: In a small bowl, whisk together one egg with a tablespoon of milk or water. Use a pastry brush to apply a thin, even layer of the egg wash over each Gipfeli. This step gives the pastries their beautiful golden-brown shine and helps create a slightly crisp outer layer.
- Bake the Gipfeli: Arrange the Gipfeli on a parchment-lined baking sheet, leaving about 2 inches of space between each one to allow for expansion. Bake for 15–20 minutes, or until the pastries are puffed and golden brown. Keep an eye on them in the last few minutes to avoid over-browning.
- Cool Before Serving: Remove the Gipfeli from the oven and let them cool on a wire rack for 5–10 minutes before serving. This allows the layers to set, making them easier to handle and enjoy.
Bonus Tips for Success
- Avoid Overloading the Filling: If you’re adding a filling, use only a small amount to prevent it from leaking out during baking.
- Ensure Proper Lamination: If you want extra-flaky Gipfeli, consider laminating the dough by folding and rolling it out with butter between layers, similar to making croissants.
- Make Ahead: You can prepare the Gipfeli up to the rolling stage, then freeze them. Bake directly from frozen, adding a few extra minutes to the baking time.
By following this step-by-step guide, you’ll be able to create homemade Gipfeli recipe that rival those from the finest Swiss bakeries. With their flaky texture, golden exterior, and endless filling possibilities, Gipfeli are sure to become a favorite in your home!
Tips and Tricks for Perfect Gipfeli Every Time
1. Mastering the Art of Flaky Layers
The hallmark of great Gipfeli is their flaky, layered texture, and mastering this requires attention to detail during the dough preparation process:
- Layering Butter and Dough Correctly: Flakiness comes from the lamination process, where butter is folded into the dough to create multiple layers. The key is to keep the butter cold and pliable but not too hard, so it doesn’t break through the dough. As you fold and roll, ensure the butter is evenly distributed to avoid gaps or uneven layers. If the butter softens too much, chill the dough between folds to maintain the structure.
- Roll Evenly: When rolling out the dough, maintain a consistent thickness. Uneven rolling can cause the butter to pool in some areas, leading to irregular textures. Use a rolling pin with guide rings if you struggle with maintaining uniformity.
- Avoid Overworking the Dough: Over-kneading or over-rolling can break the layers and compromise the flakiness. Be gentle and patient, letting the dough rest as needed during the process.
By focusing on these details, you’ll achieve the delicate, buttery layers that make Gipfeli irresistible.
2. Avoiding Common Mistakes
Even experienced bakers can encounter issues when making Gipfeli. Here are some common pitfalls and how to avoid them:
- Over-Proofing: Letting the dough rise for too long can cause it to become overly airy, leading to a loss of structure during baking. Stick to the recommended proofing times, and check the dough periodically—it should double in size but still feel firm enough to handle.
- Under-Baking: Gipfeli need to bake until they’re golden brown to achieve the right texture. Removing them too soon will result in a doughy, undercooked center. Use an oven thermometer to ensure the correct temperature, and resist the temptation to open the oven door too often, as this can disrupt the baking process.
- Improper Butter Temperature: If the butter is too cold, it may break into chunks instead of spreading evenly. On the other hand, if it’s too warm, it can seep into the dough and prevent layering. Aim for butter that is cold but pliable, and work quickly to maintain its consistency.
By addressing these issues, you’ll improve the overall quality of your Gipfeli and avoid common baking frustrations.
3. Making Variations of Gipfeli
One of the joys of making Gipfeli is their versatility. While the classic plain version is always a hit, you can get creative with a variety of sweet and savory fillings to suit different tastes:
- Sweet Fillings:
- Chocolate: Place a small piece of dark chocolate or a spoonful of chocolate spread at the base of the dough triangle before rolling.
- Jam: Use fruit jams like apricot, raspberry, or strawberry for a fruity twist. Be sure to use thick jam to prevent it from leaking during baking.
- Cinnamon Sugar: Sprinkle a mixture of cinnamon and sugar over the dough before rolling for a sweet, spiced treat.
- Savory Fillings:
- Ham and Cheese: Add a thin slice of ham and a small amount of grated cheese for a savory breakfast option.
- Herbed Cream Cheese: Spread a layer of cream cheese mixed with herbs and garlic for a creamy, flavorful filling.
- Spinach and Feta: Combine sautéed spinach and crumbled feta cheese for a Mediterranean-inspired twist.
- Shaping Variations: You can also experiment with different shapes, such as rolling the dough into tighter crescents or forming them into spirals for a unique presentation.
These variations allow you to adapt Gipfeli to different occasions, from casual breakfasts to elegant brunches. They’re also a great way to use up leftovers or showcase seasonal flavors.
How to Enjoy Gipfeli as Part of a Balanced Diet
1. Gipfeli: Nutritional Insights
Gipfeli, akin to croissants, are rich in butter and refined flour, resulting in a high energy density. A medium-sized butter croissant contains approximately 231 calories, 12 grams of fat, and 26 grams of carbohydrates. While they provide essential nutrients like B vitamins and minerals, their high saturated fat content necessitates moderation to maintain a balanced diet.
2. Incorporating Gipfeli into a Balanced Breakfast
Pairing Gipfeli with nutrient-dense foods can enhance the nutritional value of your meal. Combining them with fresh fruits, yogurt, or lean proteins can provide a more balanced intake of macronutrients and support overall health. This approach allows for the enjoyment of Gipfeli’s rich flavors while promoting a well-rounded diet.
By following these tips and trying out creative variations, you’ll take your Gipfeli-making skills to the next level. Whether you’re aiming for a traditional plain version or an inventive twist, these pastries are sure to impress every time you bake them!
How to Serve and Store Your Gipfeli
1. Serving Suggestions
Gipfeli is a versatile pastry that pairs wonderfully with a variety of beverages and accompaniments, making it perfect for any time of day. Here are some serving ideas to enhance your Gipfeli experience:
- Classic Pairings: Enjoy your Gipfeli with a freshly brewed cup of coffee, a creamy latte, or a rich mug of hot chocolate. The buttery, flaky texture complements warm drinks beautifully, making it an ideal breakfast or afternoon snack.
- Fresh and Fruity: Pair Gipfeli with a side of fresh fruit like sliced strawberries, blueberries, or a fruit salad. The light, natural sweetness of the fruit balances the richness of the pastry.
- Brunch Ideas: For a more elaborate spread, serve Gipfeli alongside an assortment of cheeses, cured meats, and jams. Create a platter with soft-boiled eggs, smoked salmon, and fresh herbs for a Swiss-inspired brunch feast.
- Sweet and Savory Toppings: For sweet lovers, drizzle honey or chocolate sauce over your Gipfeli. Savory enthusiasts can try topping them with a dollop of herbed cream cheese or pairing them with avocado slices for a modern twist.
By presenting Gipfeli in creative ways, you can turn this simple pastry into a centerpiece for any meal or occasion.
2. Storing Your Homemade Gipfeli recipe
Proper storage is key to maintaining the freshness and flakiness of your homemade Gipfeli recipe. Follow these tips to keep them tasting their best:
- Airtight Containers: Store cooled Gipfeli in an airtight container to preserve their texture and flavor. Line the container with parchment paper to prevent sticking and layer the pastries, if needed, with another sheet of parchment in between. Keep the container in a cool, dry place.
- Refrigeration: While Gipfeli can be stored at room temperature for a day or two, refrigeration is recommended for longer storage. However, keep in mind that refrigeration can make them slightly less flaky, so reheating is essential before serving.
- Freezing Tips: If you’ve made a large batch of Gipfeli, freezing is a great option. Place the pastries on a baking sheet in a single layer and freeze until solid, then transfer them to a freezer-safe bag or container. This method prevents them from sticking together. Gipfeli can be frozen for up to 3 months.
By following these steps, you can enjoy the fresh taste of homemade Gipfeli recipe even days or weeks after baking.
3. Reheating for Freshness
Reheating your Gipfeli properly is essential for bringing back their warm, flaky texture. Here’s how to do it:
- Oven Method: Preheat your oven to 350°F (175°C). Place the Gipfeli on a baking sheet lined with parchment paper and heat for 5–7 minutes. This method ensures even warming and helps restore their crispness.
- Toaster Oven: If you’re reheating just one or two pastries, a toaster oven works well. Heat them at the same temperature as the oven for a few minutes until warm and flaky.
- Avoid the Microwave: While a microwave is quick, it can make Gipfeli soggy and compromise their flaky texture. Use this method only as a last resort, heating in short bursts of 10–15 seconds.
- Reheating Frozen Gipfeli: If reheating from frozen, bake directly in the oven at 350°F (175°C) for 10–12 minutes. This method ensures the Gipfeli heat evenly without becoming dry.
Reheating your Gipfeli carefully will bring them back to their bakery-fresh quality, making each bite as enjoyable as the day they were baked.

By serving your homemade Gipfeli recipe with thoughtful accompaniments and storing them properly, you can maximize their flavor, texture, and longevity. Whether you’re enjoying them fresh out of the oven or reheated for a quick treat, these tips will ensure your Gipfeli always taste their best!
Conclusion
Making homemade Gipfeli recipe is more than just a baking experience—it’s a journey into Swiss culinary tradition, a chance to create something truly special from simple ingredients. With their golden, flaky layers and irresistible taste, Gipfeli bring warmth and comfort to any breakfast table, whether enjoyed plain, filled with sweet jam, or paired with a savory spread.
By following this step-by-step guide, you now have all the tools and tips to master the art of making perfect Gipfeli at home. From preparing the dough to shaping and baking, each step contributes to the final result: a beautifully crisp, buttery pastry that rivals those found in Swiss bakeries.
Now it’s your turn! Try this recipe, experiment with different variations, and enjoy the process of baking Gipfeli from scratch. We’d love to hear how your homemade Gipfeli recipe turned out—share your creations in the comments, post your photos on social media, and tag us so we can see your delicious results!
If you enjoyed this recipe, don’t forget to subscribe for more traditional and homemade baking guides. Happy baking, and enjoy your freshly made Gipfeli! 🍽️🥐✨